Android Development Tutorial-Tipster – Building a tip calculator for the Android OS
Android Development Tutorial -Tipster: Introduction
A tip calculator is quite a simple application. When you go with friends to a restaurant and wish to divide the check and tip, you simply add the tip percentage to the total and divide by the number of diners. I have seen this application on my simple cell phone too. So I thought of implementing it in Android as a means to learn how it all works.
When I looked at the various tutorials, each one demonstrated a specific set of features. I tried different tutorials and then set about to write an application which would be as close to a real world application. Obviously this meant using different features of the API. The end result was a good enough application which used lots of features all in one application.
I know that many developers want a short tutorial with just the code pieces and brief explanations. Somehow, I cannot just post code and few comments. I always end up writing such tutorials as if I am speaking out to a live person.
So here it is, whatever I learnt and applied, for your perusal.
Building Blocks
I am assuming that you have read the Google Android website and know a bit about Android applications. At least enough to know how to build and run the Hello World example. It would be best if you read through this set of API examples.
So, lets proceed.
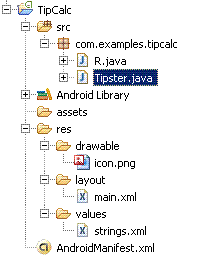
Android uses XML files for the Layout of widgets. In our example project, the Android plugin for Eclipse generates a main.xml file for the layout. This file has the XML based definitions of the different widgets and their containers.
There is a strings.xml file which has all the string resources used in the application. A default icon.png file is provided for the application icon.
Then there is the R.java file which is automatically generated (and updated when any changes are made to main.xml). This file has the constants defined for each of the layout and widget. Do not edit this file manually. The plugin is does it for you when you do a clean build.
In our example we have Tipster.java as the main Java file or the Activity.
Creating the project using the Android Eclipse Plugin
Google tutorials highlight how to use the plugin. Using the Eclipse plugin, create an Android project named Tipster. The end result will be a project layout like the following screen shot.
 Fig. 1 – Project layout for Tipster in Eclipse
This Android Tutorial is taken from whyandroid click the link to read the full article.


